Drawn By Debbie
Hand Drawn Portraits | How to Draw | Latest Drawings | Artist Tips and Information
Tuesday, November 21, 2017
The crochet helper you should be using
Raise your hand if you have trouble keeping count of your crochet rows.
I did too until I found the handiest tally stitch counter in history.
I needed a counter that allowed me to keep crocheting (or knitting) without laying down my work. I've used the good 'ole pencil and paper tally marks, which is a tried and true method...has worked for centuries...BUT you have to lay down your work, find the pencil that rolled into the floor, make your mark, pick up your work, and continue....where was I? I've used counter apps on my phone, which are handy, because you can name your projects, install pretty backgrounds, set alarms, etc., but more often than not, my screen times out and I have to unlock it, log the row, and still have the same problem....letting go of some part of my work and losing tension and consistency. I've considered the necklace-type counters, but honestly, I can see a pattern here.... With this ring counter though, I am able to keep count and keep on working with just a tap of my thumb. No dropped hook, no dropped needles....keep on truckin'!
I was skeptical that this tally counter would be awkward and/or heavy on my finger, but the adjustable strap makes it a perfect fit. As you can see in the above video, the gripped texture keeps it set at angle on my finger. The large silver button is easy to advance with my thumb, and the small silver button resets to zero. Easy peasy.
I've been using the tally counter for a couple of months now, and I really enjoy it. It seriously improves my stitch consistency while helping me keep count of my rows.
Also? Its at Amazon for under $2!! See how much easier it makes your crochet projects.
Sunday, May 30, 2010
Drawing Large Family Portraits
When drawing large family portraits, it is important to get right layout. Using a photo editor, you can help you to arrange the layout on your computer screen before making the outline on paper. This little tip has helped me to eliminate many hours of layout sketching.
Deciding where to crop each person really depends upon how many are in the portrait and your drawing style. Head and shoulders are a good place to end the drawing on each person when you have 5 or more subjects to draw. However, I have made a five person portrait (as seen to the right) showing hands and waist simply to show "togetherness". Looking close at this portrait, you will see everyone is touching someone else. This special portrait is 11x14 graphite on Bristol smooth.
Recently, I had the opportunity to draw a ten person portrait (to the left). This was a large piece, 16x20, was rendered with graphite on Bristol smooth, and took nearly 100 hours to complete.
Almost every person was taken from a separate photo. How do you get everyone to have the right size head? Here is a neat trick, you can use any photo editor where you can make layers on the file. Each person is added on a separate layer and the distance between the pupils are sized to match. It may not be true that the distance between pupils are the same for everyone, but it serves as a pretty good guide.
When drawing large family portraits, I also like to have everyone in the same general attire. For this ten person portrait I received permission from my client to have everyone in formal attire, though not every person was in formal attire. It truly helps to complete the flow of the portrait.
My most recent piece was another large family portrait which had had five people. Though this may not sound like a lot, but it becomes challenging to arrange five people symmetrically. Odd number, difficult to place. I started this portrait with the mother and father at the bottom and arranged the children in a triangle above them. This arrangement did not work well because the children seemed to be "floating" in the air above their parents. Finally, I came up with the arrangement you see here and I was very pleased, as was the owner.
A banner can be used at the bottom of large family portraits as a way to tie everyone together, as seen in this portrait. The owner wanted the family name in a banner and the words "Established 1993". After many tries of putting the entire wording inside the banner, I found that some of the wording looked just as nice, if not better below the banner. When you put wording on a portrait, keep in mind you want to be able to read it from several feet away. This way, if it is placed above a fireplace and you are six feet away, you will still be able to read it.
Drawing large family portrait can be intimidating, but if you take the time to carefully arrange the layout before putting your pencil to paper, you can eliminate a lot of time and rework stress.
Thursday, February 18, 2010
My Secret Weapon - The Paper Stump
I really love to draw skin on paper and I am asked all the time, "How do you get it to look so smooth?!?". Well, today, I will reveal my secret weapon: the paper stump! A paper stump is simply a drawing tool made of tightly rolled paper. They are great because they come in several sizes and can be sharpened and cleaned. More on that later.
To draw skin, I start with a fairly soft pencil, usually a B or 2B and make gentle marks on the paper. Drawing gently is important because if you press too hard the marks will not blend completely and you will be able to see the pencil marks. Some artists like to see the marks left by the pencil, I, generally, do not. I like skin to look as smooth as a black and white photo, especially when I draw children and women. Women love the "wrinkle smoothing effects" of the paper stump. It's like a painless face lift.
I draw pencil marks in the direction I will be using the stump. If the area needs to be dark, crosshatching works well.
First, dirty stumps. The term "dirty stump" means the tip of the stump is covered with your medium, be it graphite or charcoal. Dirty stumps are great for halftones or where you need just a bit of shadowing. Not only do they make great halftones, but they are also great for soft lines which are easy to erase, provided you use a gentle touch. Nothing will take out medium that is ground into the paper.
 Now, let's talk about clean stumps. A clean stump is just what it sounds like: the stump tip is clean and free of medium. I use a clean stump to grab graphite and blend. You can lighten an area of graphite by actually removing the graphite from the paper. It is a very gradual lightening as opposed to using a kneaded eraser. However, it will only lighten so far until the graphite is ground into the paper.
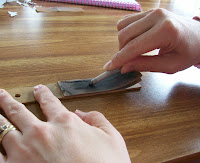
How do you get a clean paper stump after it is dirty? Easy! You will need something to actually grind away the end of the stump. I suggest a sandpaper block . A sandpaper block
 has little sheets of sandpaper stapled to a wood block. The handle gives you something to hold to while you are pulling the stump in the opposite direction. You can also use a small piece of regular sandpaper or even an emery board.
The great thing about a paper stump is its versatility. You can use it dirty or clean. I will explain both and how you can get a stump dirty or clean.
 Now, let's talk about clean stumps. A clean stump is just what it sounds like: the stump tip is clean and free of medium. I use a clean stump to grab graphite and blend. You can lighten an area of graphite by actually removing the graphite from the paper. It is a very gradual lightening as opposed to using a kneaded eraser. However, it will only lighten so far until the graphite is ground into the paper.
 How do you get a clean paper stump after it is dirty? Easy! You will need something to actually grind away the end of the stump. I suggest a sandpaper block
Wednesday, February 3, 2010
Beyond Drawing
 As a portrait artist, I am asked quite frequently "What are you drawing now?" so in this blog you will find my latest drawings.
 Currently, I draw with graphite and some charcoal. I've learned so many neat things about drawing and studying art in black and white and I hope to learn much, much more.
So many neat and artistic things are here on the internet and want to share them with everyone. This seems to be a great place to do just that. The internet is a world of opportunity to meet people, learn things and ....make some money!
I hope you will join me as I share new thins, it will be an exciting journey!
Subscribe to:
Comments (Atom)
-
When drawing large family portraits , it is important to get right layout. Using a photo editor, you can help you to arrange the layout on ...
-
I really love to draw skin on paper and I am asked all the time, "How do you get it to look so smooth?!?". Well, today, I w...
-
Raise your hand if you have trouble keeping count of your crochet rows. I did too until I found the handiest tally stitch counter in ...


